Low-temperature Physical Property Analysis of Key Materials of Valves
In order to study the performance, rules of size changes at low temperatures, changes of microstructure, and cracking of surfacing layers of the valve body's material AISI 304 and the sealing surface surfacing Ni40 and Ni60 hard alloys at low temperatures, the following tests were carried out:
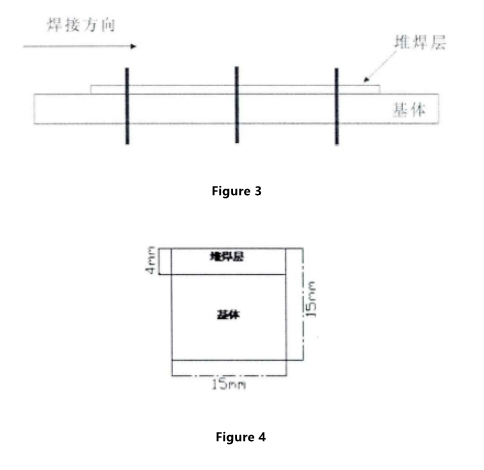
The most important performance index of materials in service at low temperatures is the low-temperature impact toughness. It is very necessary to determine the impact toughness of AISI 304 and AISI 304 surface hardfacing hard alloys at different temperatures through impact tests at room temperatures and low temperatures. Process AISI 304 into a standard impact specimen with a square section of 55 mm in length and 10 mm x 10 mm in cross-section, and a v-shaped groove in the middle of the length of the specimen. The AISI 304 with Ni40 and Ni60 hard alloy surfacing on the surface was processed into impact specimens according to Figure 1. The thickness of the surfacing layer and the base metal was 5 mm each. A v-shaped groove is created at the side of the base metal and surfacing, overlap side of the surfacing layer and base material for the test specimen with Ni40 hard alloy surfacing. The v-shaped groove is created at the side of the base material of the specimen with Ni60 hard alloy surfacing. The v-shaped groove has an angle of 45°. Its depth is 2 mm, and its bottom radius of curvature is 0.25 mm. Charpy v-shaped groove impact tests are carried out for each sample at room temperatures of -60℃, -100℃, -140℃ and -196℃. The equipment used for the low-temperature impact test is shown in Figure 1.
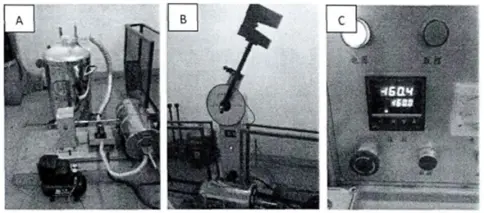
Figure 1 The schematic diagram of impact samples of base metal plus surfacing layers
Put the impact sample into the low-temperature box provided with the low-temperature impact tester, and blow liquid nitrogen. The temperature of the sample continues to drop. After cooling to the specified temperature, keep it at this temperature for 20 minutes. Then, through the automatic push device, the impact sample is pushed from the low-temperature box to the sample table, and the impact test is performed.
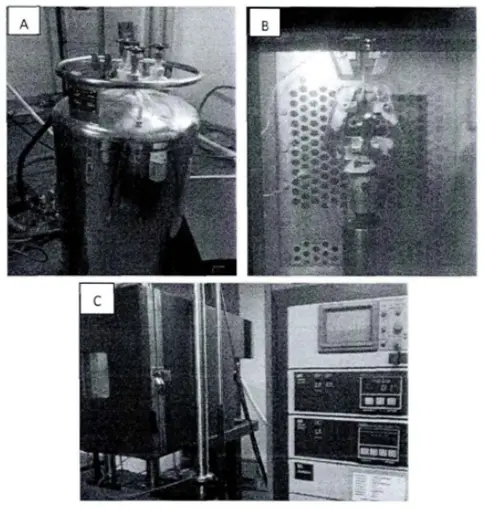
Figure 2 Low-temperature stretching equipment: (A) Liquid nitrogen cooling devices (B) Environmental chambers (C) Temperature control systems
In order to study the changes in plasticity and strength of AISI 304 at room temperatures and low temperatures, the yield strength, tensile strength elongation after fracture and reduction of area of AISI 304 at room temperatures and low temperatures were measured by tensile tests at room temperatures and -196℃. The specimens and test methods of the tensile test at room temperatures are completely carried out in accordance with tensile test methods for metallic materials at room temperatures in the GB228-2002. The specimen size is a standard short specimen of φ5 mm. The specimens and test methods of the low-temperature tensile test are performed in accordance with GB/T13239-2006 Metallic Materials Low-temperature Tensile Tests, and the specimen size is also a standard short specimen of φ5 mm. The low temperature tensile test equipment is shown in Figure 2. (A) is the matching liquid nitrogen cooling device. (B) is the internal structure of the low temperature environment chamber, and the tensile sample is in the environment chamber; the iron wire is the thermocouple. (C) The left side is the appearance of the environmental chamber, and the right side is the temperature controller (displaying a temperature of -81℃). The white tube on the back of the environmental chamber is the liquid nitrogen delivery tube. It has been frosted, so it is white. During the test, the sample is clamped on the low-temperature tensile testing machine, and pour liquid nitrogen to the low-temperature chamber. Keep it for 20 minutes to perform the tensile test after reaching the set temperature.
2. Microhardness tests
Use the MVC-1000B Vickers hardness tester to measure the hardness gradient of AISI 304 plus Ni40 and AISI 304 plus Ni60 from the base material to the surfacing layer before and after the cryogenic treatment, and summarize the impact of the cryogenic treatment on the hardness of the material. The working load of the MVC-1000B Vickers hardness tester is 1000g and its load time is 15 seconds. First, perform the hardness test on each sample at room temperatures, and then perform cryogenic treatments. The cryogenic treatment temperatures are -60°C, -100°C, -140°C and -196°C, and the cryogenic treatment time is 2 hours. After the cryogenic treatment, the hardness test was performed on each sample. The hardness changes before and after the cryogenic treatment were compared.
3. The influence of low temperatures on the shape and size of the material
In order to study the effect of the cryogenic treatment on the microstructure of the material, Nikon-MA100 metallurgical microscope and ZEISS EVO 18 scanning electron microscope were used to observe AISI 304 and surfacing layer Ni40 and Ni60 before and after the cryogenic treatment, and MVC-1000B Vickers hardness testers were used to leave the indentation on the sample as a mark. Compared the metallographic photos and the scanned photos near the indentation before and after the cryogenic treatment. The sample preparation processes were as follows:
In order to further study the influence of the cryogenic treatment on the phase analysis of AISI 304, Ni40 and Ni60 cemented carbides before and after the cryogenic treatment, the phase analysis was carried out before and after the cryogenic treatment by using a Shimadzu XRD-6000 X-ray diffractometer. The phase changes of the material before and after the cryogenic treatment were compared. The sample preparation processes were as follows:
- The hardness gradient test from the base metal to the surfacing layer before and after the cryogenic treatment
- AISI 304 impact and tensile tests at room temperatures and low temperatures
- Impact tests of base metal plus surfacing layers with grooves at different positions at room temperatures and low temperatures
- The metallographic analysis of base metal and surfacing layers before and after the cryogenic treatment
- The scanning electron microscope analysis of base metal and surfacing layers before and after the cryogenic treatment
- The XRD phase analysis of base metal and surfacing layers before and after the cryogenic treatment
The most important performance index of materials in service at low temperatures is the low-temperature impact toughness. It is very necessary to determine the impact toughness of AISI 304 and AISI 304 surface hardfacing hard alloys at different temperatures through impact tests at room temperatures and low temperatures. Process AISI 304 into a standard impact specimen with a square section of 55 mm in length and 10 mm x 10 mm in cross-section, and a v-shaped groove in the middle of the length of the specimen. The AISI 304 with Ni40 and Ni60 hard alloy surfacing on the surface was processed into impact specimens according to Figure 1. The thickness of the surfacing layer and the base metal was 5 mm each. A v-shaped groove is created at the side of the base metal and surfacing, overlap side of the surfacing layer and base material for the test specimen with Ni40 hard alloy surfacing. The v-shaped groove is created at the side of the base material of the specimen with Ni60 hard alloy surfacing. The v-shaped groove has an angle of 45°. Its depth is 2 mm, and its bottom radius of curvature is 0.25 mm. Charpy v-shaped groove impact tests are carried out for each sample at room temperatures of -60℃, -100℃, -140℃ and -196℃. The equipment used for the low-temperature impact test is shown in Figure 1.
Figure 1 The schematic diagram of impact samples of base metal plus surfacing layers
Put the impact sample into the low-temperature box provided with the low-temperature impact tester, and blow liquid nitrogen. The temperature of the sample continues to drop. After cooling to the specified temperature, keep it at this temperature for 20 minutes. Then, through the automatic push device, the impact sample is pushed from the low-temperature box to the sample table, and the impact test is performed.
Figure 2 Low-temperature stretching equipment: (A) Liquid nitrogen cooling devices (B) Environmental chambers (C) Temperature control systems
In order to study the changes in plasticity and strength of AISI 304 at room temperatures and low temperatures, the yield strength, tensile strength elongation after fracture and reduction of area of AISI 304 at room temperatures and low temperatures were measured by tensile tests at room temperatures and -196℃. The specimens and test methods of the tensile test at room temperatures are completely carried out in accordance with tensile test methods for metallic materials at room temperatures in the GB228-2002. The specimen size is a standard short specimen of φ5 mm. The specimens and test methods of the low-temperature tensile test are performed in accordance with GB/T13239-2006 Metallic Materials Low-temperature Tensile Tests, and the specimen size is also a standard short specimen of φ5 mm. The low temperature tensile test equipment is shown in Figure 2. (A) is the matching liquid nitrogen cooling device. (B) is the internal structure of the low temperature environment chamber, and the tensile sample is in the environment chamber; the iron wire is the thermocouple. (C) The left side is the appearance of the environmental chamber, and the right side is the temperature controller (displaying a temperature of -81℃). The white tube on the back of the environmental chamber is the liquid nitrogen delivery tube. It has been frosted, so it is white. During the test, the sample is clamped on the low-temperature tensile testing machine, and pour liquid nitrogen to the low-temperature chamber. Keep it for 20 minutes to perform the tensile test after reaching the set temperature.
2. Microhardness tests
Use the MVC-1000B Vickers hardness tester to measure the hardness gradient of AISI 304 plus Ni40 and AISI 304 plus Ni60 from the base material to the surfacing layer before and after the cryogenic treatment, and summarize the impact of the cryogenic treatment on the hardness of the material. The working load of the MVC-1000B Vickers hardness tester is 1000g and its load time is 15 seconds. First, perform the hardness test on each sample at room temperatures, and then perform cryogenic treatments. The cryogenic treatment temperatures are -60°C, -100°C, -140°C and -196°C, and the cryogenic treatment time is 2 hours. After the cryogenic treatment, the hardness test was performed on each sample. The hardness changes before and after the cryogenic treatment were compared.
3. The influence of low temperatures on the shape and size of the material
- Process AISI 304 into a sample of φ10 x 22 mm. Measure its diameter and length at room temperatures and at a temperature of -196°C, and calculate the size change rate of AISI 304 in the length direction and diameter direction at a temperature of -196°C.
- Process AISI 304 into a disc simulation sample of a valve with φ50 x 20 mm. The surface is ground and smooth, and the finish reaches ∇10. After two hours of cryogenic treatments at a temperature of -196°C, the surface unevenness is measured by a micrometer at room temperatures. After the measurement is completed, grind the surface to make the smoothness reaches ∇10. Then, measure the unevenness of the surface after the sample is subjected to the cryogenic treatment at a temperature of -196°C for two hours.
In order to study the effect of the cryogenic treatment on the microstructure of the material, Nikon-MA100 metallurgical microscope and ZEISS EVO 18 scanning electron microscope were used to observe AISI 304 and surfacing layer Ni40 and Ni60 before and after the cryogenic treatment, and MVC-1000B Vickers hardness testers were used to leave the indentation on the sample as a mark. Compared the metallographic photos and the scanned photos near the indentation before and after the cryogenic treatment. The sample preparation processes were as follows:
- Using wire-electrode cutting to cut samples
- Polished the sample with sandpaper 200 to 1500#.
- Polished the sample with the polishing agent.
- Used chemical reagents to corrode the sample; the corrosive agent selected for AISI 304 was HCI: HNO3=3:1; Ni40 and Ni60 were electrolytically corroded. The polishing solution was oxalic acid of 10g plus 100mLH2O; the voltage was 6V; the time was 10 seconds.
In order to further study the influence of the cryogenic treatment on the phase analysis of AISI 304, Ni40 and Ni60 cemented carbides before and after the cryogenic treatment, the phase analysis was carried out before and after the cryogenic treatment by using a Shimadzu XRD-6000 X-ray diffractometer. The phase changes of the material before and after the cryogenic treatment were compared. The sample preparation processes were as follows:
- Used wire-electrode cutting to cut the sample with a size of 10 x 4 x 4 mm on the base material and surfacing layer respectively.
- Polished the sample with 200 to 600# sandpaper to make the surface smooth.
- Performed ultrasonic cleaning.