The actual force of the workpiece can be simulated by computer, and its displacement, stress and strain can be analyzed. The commonly used analysis methods include computer finite element simulation analysis and fluid simulation analysis. The elastic deformation of the sphere and valve seat of metal seated ball valves was studied by using the two analysis methods.
4.1 The analysis of finite element simulation
4.1.1 Simplified models
Before the finite element analysis, the model is first simplified according to the characteristics of stress and deformation.
(1) The stiffness of the valve body is very great and the deformation is very small, so the structural analysis of the valve body is omitted.
(2) The sphere is fixed by the upper and lower shafts. It is assumed that the upper and lower shafts are sufficiently rigid, and the structures of the upper and lower shafts are omitted.
(3) The spring, O-ring and graphite sealing ring have no effect on the contact between the ball and the valve seat and can be omitted.
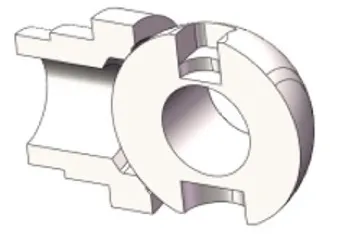
The simplified model is shown in Figure 2. Since the sphere is in a fixed state, it can be analyzed separately. However, the valve seat is floating, which is not suitable for an independent analysis. The combined analysis of the sphere and the valve seat is closer to the actual situation, so the sphere and valve seat components are analyzed separately.

Figure 2 Simplified models
4.1.2 The analysis of the sphere
(1) Create a new example and select the analysis of static stress.
(2) Divide gridding. Select a curvature-based mesh, and using a variable element size to generate gridding is conducive to obtaining accurate results for tiny features. The higher the grid density is, the more accurate the results become. However, the grid division and solution time are longer, and the requirements for computer configuration are also higher. The model size of this example is small, so high-precision gridding is used. For large-scale models, it is recommended to use gridding with medium density acquiesced in the software.
(3) For the application material, the sphere matrix material is A182 F304.
(4) Add a load, and apply a pressure of 42MPa to all parts in contact with the medium.
(5) Add a fixture, and the fixture is set to be fixed on the bearing surface of the upper and lower shaft holes, which is in line with the actual situation.
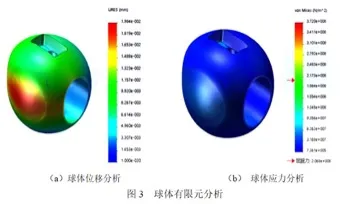
The results of the static analysis of the sphere are shown in Figure 3. It can be seen from the analysis results that the stress is concentrated at the position of the upper shaft hole. The maximum stress exceeds the yield strength. The spherical stress is small. Elastic deformation occurs, which is uneven. The maximum deformation occurs at the horizontal ball mouth position, and the deformation amount is about 0.01805mm.

(a) The analysis of the displacement of the sphere
(b) The analysis of stress of the sphere
Figure 3 The finite element analysis of spheres
4.1.3 The static analysis of balls and valve seats
(1) Create a new example and select static stress analysis.
(2) The grid division rules are the same as the sphere static analysis.
(3) For the application material, the base material of the sphere and the valve seat is A182 F304, ignoring the second coating of the seal.
(4) Set the connection. Select the sealing pair to set the global contact. There is no penetration, and the friction coefficient is 0.25.
(5) Add load, pressure of 42MPA to all parts in contact with the medium, and the spring force of 1100N to the valve seat.
(6) The way of adding fixtures is the same as that of sphere static analysis.
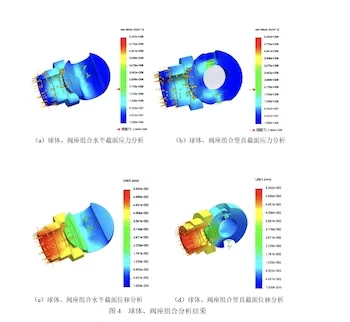
The analysis results of the combination of the ball and the valve seat are shown in Figure 4. It can be seen from the figure that the stress is concentrated at the position of the shaft hole on the sphere, and the maximum stress exceeds the yield strength; the spherical stress is small, resulting in elastic deformation, and the deformation is uneven. The deformation of the horizontal ball mouth position is 0.02116 to 0.02151mm, and the deformation of the upper and lower positions is 0.01155 to 0.01639mm. The stress on the valve seat does not exceed the yield strength, and elastic deformation also occurs; the deformation of the horizontal position of the sealing surface is 0.03571 to 0.03635mm. The deformation of the upper and lower positions is 0.02973 to 0.04044mm; the elastic deformation of the valve seat can compensate for the elastic deformation of the sphere to achieve sealing.

(a) The analysis of stress of horizontal sections of spheres and valve seats
(b) The analysis of stress of vertical sections of spheres and valve seats
(c) The analysis of displacement of horizontal sections of spheres and valve seats
(d) The analysis of displacement of vertical sections of sphere sand valve seats
Figure 4 Analysis results of balls and valve seats
4.2 The analysis of fluid simulation
The fluid simulation analysis is to analyze the workpiece by loading the fluid load. It must be combined with a sphere and a valve seat to form a space that can contain fluid.
(1) Set the guide. Set the medium to water or gas, and set parameters like density.
(2) Create a cover to form a confined space.
(3) Set the boundary conditions, and set the size and direction of the medium pressure.
(4) Set goals.
(5) Running.
(6) Export the results to simulation.
(7) Create a simulation stress analysis.
(8) Set the material.
(9) Set the automatic search for contacting groups.
(10) The fixture settings are the same as the sphere static analysis.
(11) Add a load and select the saved flow effect.
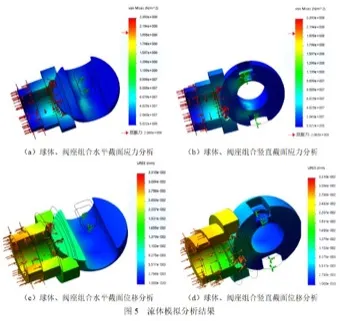
The results of the fluid simulation analysis are shown in Figure 5. The stress is concentrated at the position of the shaft hole on the sphere, and the maximum stress exceeds the yield strength; the spherical stress is small, resulting in elastic deformation, and the deformation is uneven. The stress on the seat does not exceed the yield strength, and elastic deformation also occurs. The deformation of the horizontal position of the sealing surface is 0.02218 to 0.02284mm, and the deformation of the upper and lower positions is 0.01991 to 0.02408mm; the elastic deformation of the valve seat can compensate for the elastic deformation of the sphere to achieve sealing.

(a) Stress analysis of horizontal section of sphere and valve seat combination
(b) Stress analysis of vertical section of the combination of sphere and seat
(c) Displacement analysis of horizontal section of sphere and valve seat combination
(d) Displacement analysis of vertical section of sphere and valve seat combination
Figure 5 Fluid simulation analysis results
5. Conclusion
Finite element simulation analysis and fluid simulation analysis are used to analyze the sphere of the metal seated trunnion ball valve and the assembly of the sphere and the valve seat. The analysis results are slightly different due to different parameter settings, but the trend of the analysis results is consistent. For the leakage caused by elastic deformation under high and low temperatures, certain analyses and verification can be obtained by the method in this article, which provides a reference for the optimized design and process.
